Pages

  • RSS

Tuesday 24 December 2013

Steampunk Bustle (And an Old Blue One!)

Here is a little bustle I whipped up a couple of weekends ago. I wanted something that was easier to wear than my blue bustle (which I will also show you!), that I could also wear with shorter steampunk skirts.

I have made it from Truly Victorian pattern TV101, but modified the lower half by completely omitting the lower ruffle and cutting the lower edge of the top half on a curve, so that it pulls up just at the knees, making movement easier. I added my own small ruffle to the bottom edge.

Bustle front.
Better view of the curved ruffle.
Bustle side.
Mmmmm, lace!

I've made this bustle from sage green & cream striped material, which I have no idea what it is made from, but definitely not cotton! Trimmed with pre-gathered cream lace and flat cream lace trim with chocolate brown ribbon threaded through and some little ribbon bows. The inside ties are cream ribbon, which could be a little bit more ... grippy, but at least they don't slip when I tie them.

Through the front opening to the bustle ties.

Lying flat on the floor with the front of the skirt flipped up.

The blue bustle mentioned earlier. Also made from Truly Victorian pattern TV101 in dark blue drill with no trimmings. The first time making this pattern, and as I expected from TV, it was very easy to put together.


View of the bustle under the ruffled over-drape.

The only thing I would do differently if I make another full length bustle would be to cut the top half of the bustle in a slightly bigger size, since it hugs my legs quite firmly. My fault though, I just cut it all the one size instead of measuring myself properly and choosing a size to fit each part of my body.

Saturday 21 December 2013

Etsy Discount Code

This is a little bargain for anyone who might be reading and wants to check out my Etsy shop.
I have added a couple more corsets that don't quite fit me properly, and if you quote NEWYEAR13 at the checkout, you get 10% discount!
Yay!


I will update sometime in the new year, have been too busy for any sewing, much less any blogging.

Friday 25 October 2013

Costume Clean-Out

I have reached the point where I think a clean out of my costume cupboard is required. Okay, yes, and I do need more of that horribly important stuff called money for more costumes. Currently I am on a very tight budget due to the upcoming purchase of a house -yay!- so I have made a rule for myself that I must sell something in order to sew something else. I'm feeling terribly frugal!

You can check out my items on Etsy here, this is the only listing at the moment, but I will be adding more when I can get them photographed.


I am selling this black Victorian corset because it does not fit me perfectly. What was I thinking when I decided on the pattern sizes? I gave myself too much room at the hips and bust. But happily I have learned from my mistakes and once I've sold this, I will be able to produce the perfect corset.
Hopefully it will go to a good home, since it has a lovely shape.

It is from the Laughing Moon Silverado pattern, sewn with one layer of heavy black satin, lined with one layer of tea dyed coutil. All bones are spiral steel, except for the lacing bones at the back, obviously.

And I have been busy sewing despite blog silence, so I will post more soon. Buying a house is time consuming!

Saturday 31 August 2013

Regency Corset

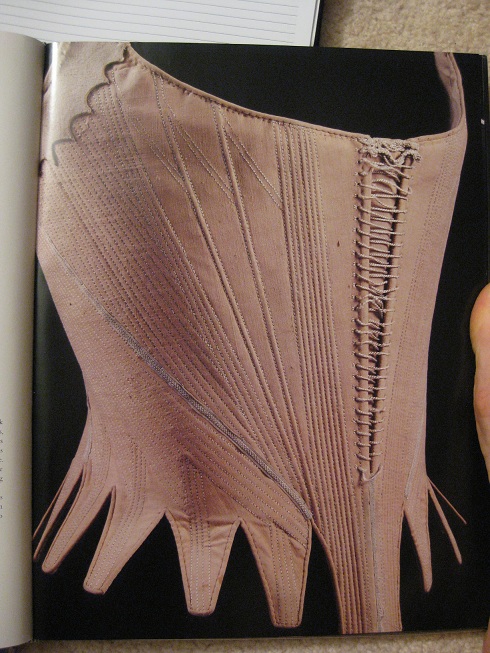
I have been very lazy with my blogging lately. But here is something I finished a little while ago, and have only just got around to photographing it. It is a regency corset from Jean Hunnisett's 'Period Costume for Stage and Screen'. This is my second attempt at this corset, the first try was ghastly. Mainly because I didn't scale the pattern up enough, so it was too small, and I used stiff coutil instead of soft cotton drill, so the silhouette was very Victorian with a nipped in waist. It was truly awful, so I am never posting pictures. But more about that later.


Here is the corset flat. I used two layers of soft cream cotton drill. This is strong enough, while still not being too rigid. There are four white steel bones at the front instead of a busk, on the other side of the bust gussets and at the back lacing. The rest are spiral steel.

Look at that lovely shelf!
Now let me share with you some things I have learnt about making Regency Corsets.

-Do not make your corset/stays out of stiff coutil, as I made the mistake of doing with my first one. Regency is all about willowy lines, not a Victorian hourglass.

-Do not use a plastic ruler as your busk! This might seem obvious, but I did this in the horrible first attempt, because I read on another blog that someone used this and it worked for them. Not me. I was afraid of snapping it when I bent over, and they are just not made to be put in tight garments. I used four white steel bones, which are comfortably springy while keeping the bust separated.


-Use cording. Please. It makes a huge difference under the bust, even if you don't use it anywhere else. I found that in my first corset, without cording, there was a definite desire for even my small bosom to creep away. Cording has become my new favourite sewing technique, because although it seems hard (or it did to me), I found that it is actually amazingly fun. I used this cording tutorial which is fantastic and easy: - http://www.jennylafleur.com/study/runners.htm


-I used spiral steel boning throughout the corset, except in the boning channel beside the busk. I would have used plastic cable ties instead of spirals, like Romantic History's lovely example, but when I tried the corset on, the plastic ties twisted because the channels have a decided curve. So I went with the spiral steel for flexibility.
In the channel beside the bust gussets, I used stiff white steel boning. This keeps the bosom from creeping sideways, which it was doing with the spiral steel and lighter weight steel boning.


Finally, my findings are this: I think if you are using cording under the bust and stiff white steel bones on either side, it doesn't matter what you do with the rest of the corset, the front will do it's job of creating the proper regency silhouette.
Another thing I changed with this pattern, which is drafted to fit a modern size 10, was that I shortened the bust gussets by about an inch. Leaving them at the level of the pattern made them no higher than a normal bra.

Also, do not be tempted to make the bust gussets small and tight, thinking that is will push up the bosom. I made this mistake again on my first corset, and it was unsightly. Not to mention uncomfortable. This corset I made the gussets slightly bigger than I thought I would need. When the corset it laced, it fits perfectly. And if you have added cording and straight steels to keep them in place, the bust will be cupped nicely.

The only thing I would change about this corset is the lacing. It is annoying to get in and out of, since there is no Victorian separating busk, so I will one day buy some fan lacing slides when I have enough money for more corsetry!

Wednesday 15 May 2013

Innocent Fabric and Some Very Evil Dye

My SWATH (Snow White and the Huntsman) costume is not going well. I haven't even started sewing it yet, and already trouble is brewing. Over the weekend I went shopping for the material. Green suede with some brown dye to render it more earthy, cream cotton for the underskirt and white cotton which I planned to dye with a mixture of grey and blue. Or so I thought.

Goodies!
Deciding that I would only need the grey colour, I put the grey dye in a giant bucket and stirred it up with boiling water and salt, following the instructions. Trustingly, I asked my Dear Mother's opinion of the colour, which I thought looked too purple. She said to drop it in and get it out straight away and we should be right. This is what came out. -Sniff-. Not the silvery-pale blue on the left, the navy blue on the right. I nearly cried. My only consolation is that it is actually a very nice colour, so I can eventually make something else out of it, but not my underdress.

Good & ...
...Evil!
It was put through the washing machine immediately, but didn't lose any of the colour. So I guess its back to the shops for some pale blue cotton, in a shade near enough to what I want, since I am too scared to make another attempt at dying more. Needless to say, I will be VERY careful and only put the tiniest pinch of brown dye with my green suede, since it is almost the right colour now. It only needs a light wash of brown.
And this time I will test a scrap, instead of being lazy. I have learnt from my mistake already. =) 

Friday 10 May 2013

Snow White and the Evil NonStep-Sister

  My last post was all future Regency clothing joy, ahh, glee. Visions of skipping through flower filled meadows in the spring and all that. That was until The Event happened. Yes, my sister has been the cause of this evil. She was supposed to be planning and sewing, to my joy, the costumes that she, my brother and I would be wearing to the Abbey Medieval Fair this year. Her costume ideas are amazing, I constantly find myself jealous of them. In a good way! She is good at creating, I work well from someone else's idea. Hence my love of re-creating movie costumes.
  Anyway, yesterday she announced out of the blue that she had come to the conclusion that she will not get the costumes finished for this year's fair, in two months, and will save them for next year. Eeeek! Luckily I have an outfit I've been dying to sew, and this gives me an excuse to go and Shop For New Fabric. Haha!


  Snow White's dress from Snow White and The Huntsman. I will be making the full length version she only wears for the first part of the movie, but there are no costume shots of that. I know that the overdress is made of green suede, but I can't find any reference for the underdress. I'm thinking perhaps some kind of pale blue cotton. Hmm.


  I am armed with Simplicity pattern #1773, which I will modify to look more like the movie costume. Maybe just using less ghastly fabric will help ... =)
  I only hope I will finish it in time, but I will post pics along the way. If I remember to document my sewing exploits, which I am notoriously bad at. 

Tuesday 16 April 2013

Despair and Doom ... And a Challenge!!

I think I am stuck in the Corset Hole of Despair and Doom right now. Nothing is going how I planned. I am halfway through my long-line 1912 corset, a pair of 18th Century stays and two Regency corsets, both short and long.
But, I have a Plan. I have challenged myself to some Regency sewing. It was originally going to be that I would sew all Elizabeth's gowns out of the latest Pride & Prejudice movie, but I don't like/need all of them, so I am going to be sewing selected gowns from three Jane Austen movies and mini-series!! I have given myself the rest of 2013 to complete this project in, since it will probably take a while.


I love the BBC mini-series! Having speed-watched all three, I have decided that I will have to make nearly all of Emma's dresses, because they are so beautiful, not because I need them. But isn't that always the way?! I will make most of Elizabeth's dresses in P&P and some of Elinor's from S&S. 
Hopefully having a project will goad me forward out of the lazy rut I am in. I do have to finish one of the Regency corsets I'm working on before I can start, so I will post progress soon. I hope.


Saturday 13 April 2013

American Duchess - New Highbury Regency Shoe!

Okay, first of all, sorry I haven't blogged for ages, but I have had lashing of inspiration for a fun project I will share later. For now though, here's another post in an attempt to win a pair of beautiful American Duchess shoes. =)


I mean, look at them, they have ribbons!! (Happy squeal!)  Can't you imagine walking like Elizabeth Bennet through the mud all the way to Netherfield Park for Jane? And being sniffed at for the inches and inches of mud on your hem? 
These shoes are also perfect for the project hinted at earlier...

Sunday 31 March 2013

Sewing History 1 - First Ever Project!!

This is the first historical costume that I sewed, many years ago when I was much younger. I used Simplicity #4940, view B without the vest. I fell in love with the long medieval sleeves, and I loved them until I tried doing normal things while wearing the dress. Now I'm not so in love with them. Sure, they look beautiful, but they are highly impractical. Try eating in them!!

Who would like some 'garnish a la sleeves' with their meal?!

This was also probably as high as I can raise my arms in this dress. And as you can see, I'm struggling between standing up straight and trying to hide my feet, so another valuable lesson was learnt with this. I always add length to whatever I sew now, since I am taller than the small people most patterns are designed for.=)

Saturday 2 March 2013

KCI Brown Stays

One of the projects I'm working on right now is an 18th century corset. When it is finished, it will hopefully turn out like this one, from the Kyoto Costume Institute.


Or this one from the V & A Museum. I can't quite decide which would look better. Or maybe I should find the easiest to make.


I'm working on the pattern for the KCI stays at the moment, and the process is making me grumpy, because I am trying to draft my own from the book, where there is a picture of the pattern they made.
I could probably make a Victorian corset from scratch with my eyes closed by now, but I have only made one 18th century corset. Which was a horrible disaster. So I am very cautious about making this one, since my sewing skills are a little unfamiliar with the period.
I used the Butterick #4484 last time and stupidly chose my dress size instead of the size I wished to become. So it is far too big to be useful.
Next time, if there is one, I will know better. Soon I will get around to posting all my older, completed projects, since I don't have any photos of the 18th century stays to put up with my complaints. =)

Friday 25 January 2013

Peach Victorian Corset


I am nearly finished a new Victorian corset, in my apparently never ending quest for the perfect one. It is from a pattern I found online, which I believe is from Corsets and Crinolines by Nora Waugh.


I was too frightened to use a spoon busk as with the original and I did not alter the curved front seam for a straight busk. I was worried it would gape, but there is only a bit of looseness at the bottom.


I did not alter the size of the pattern, since it was nearly my size. It is a good fit at the waist, a little small at the hips and probably too large at the bust. I will post complete measurements when it is finished. But I love the shape so much I will try and sew another when my budget (and conscience!) allows.

Playing with trimmings
 You can nearly see it here, the fabric buckled a little, but I think its really clever the way the eyelets at the waist are set close together so that the gap between lacing you get with the 'rabbit's ears' looks nicer.


Lace, eyelets and the tiny pink ribbon I threaded through the bottom edge. I have just run out of bias tape in the right shade to finish binding the last edge of my corset, so the finished photos will have to wait.